5. 如何使用git打patch?--"git format-patch;git am;git apply"
作者:jicanmeng
时间:2015年03月21日
1. linux下的标准命令: diff和patch
首先看一看linux环境下的标准的生成patch的命令"diff"和打patch的命令"patch"。
diff命令的语法如下:
diff [-uNr] from-file to-file
    -u  -U NUM  --unified[=NUM]
        Output NUM (default 3) lines of unified context.
    -N  --new-file
        Treat absent files as empty.
    -r  --recursive
        Recursively compare any subdirectories found.
patch命令的语法如下:
patch [-R] [-pN] [ORIGFILE] --input=patchfile
patch [-R] [-pN] [ORIGFILE] < patchfile
    -p NUM  --strip=NUM
        Strip NUM leading components from file names.
    -R  --reverse
        Assume patches were created with old and new files swapped.
    -i patchfile  or  --input=patchfile
        Read the patch from patchfile.  If patchfile is -, read from standard input, the default.
默认情况下,会修改patchfile中的---开头的文件。我们可以指定修改哪一个文件。
只看是不能明白的。来实际操作一下。有两个文件:hello和world。(这两个文件来自于<<git权威指南>>第一章的例子)。hello内容如下:
应该杜绝文章中的错别子。

但是无论使用
*全拼,双拼
*还是五笔

是人就有可能犯错,软件更是如此。

犯了错,就要扣工资!

改正的成本可能会很高。
world文件内容如下:
应该杜绝文章中的错别字。

但是无论使用
*全拼,双拼
*还是五笔

是人就有可能犯错,软件更是如此。

改正的成本可能会很高。

但是“只要眼球足够多,所有Bug都好捉“,
这就是开源的哲学之一。
使用命令diff产生patch文件,diff最常用的option就是-u,表示产生的patch文件中带有上下文。
$ diff -u hello world > diff.patch
			$
diff.patch文件内容如下:
--- hello	2015-08-30 09:51:31.459999126 +0800
+++ world	2015-08-30 09:51:00.436999142 +0800
@@ -1,4 +1,4 @@
-应该杜绝文章中的错别子。
+应该杜绝文章中的错别字。

 但是无论使用
 *全拼,双拼
@@ -6,6 +6,7 @@

 是人就有可能犯错,软件更是如此。

-犯了错,就要扣工资!
-
 改正的成本可能会很高。
+
+但是“只要眼球足够多,所有Bug都好捉“,
+这就是开源的哲学之一。
使用命令patch来对某个文件打patch。
[jicanmeng@andy temp]$ diff -u hello world > diff.patch
			[jicanmeng@andy temp]$ ls
			diff.patch  hello  world
			[jicanmeng@andy temp]$ rm world
			[jicanmeng@andy temp]$ cp hello world
			[jicanmeng@andy temp]$ patch world < diff.patch
			patching file world
			[jicanmeng@andy temp]$ patch -R world < diff.patch
			patching file world
			[jicanmeng@andy temp]$ patch < diff.patch
			patching file hello
			[jicanmeng@andy temp]$ patch -R < diff.patch
			patching file hello
			[jicanmeng@andy temp]$
最后四条命令中,patch world < diff.patch和patch -R world < diff.patch两条命令指定对world进行patch操作。而patch < diff.patch和patch -R < diff.patch两条命令没有指定对哪个文件进行patch操作,默认对hello文件进行了patch操作。如果不指定要打patch的文件,就从diff.patch文件进行寻找,第一行如下:--- hello 2015-08-30 09:51:31.459999126 +0800 ,表示这个文件是from-file,因此对hello文件打patch。
patch最常用的option是-p,表示寻找要打patch的文件时,去除几个forward-slash符号。这个知识点在《鸟哥的linux私房菜》里面有详细的描述。这里需要指明一点,如果不指定-p选项,那么patch程序就会在当前目录下面寻找对应的文件。指定了-p选项后,才会按照去除forward-slash后的路径一级级地寻找对应的文件。
2. git下的patch命令: git diff和git apply
当我在工作区修改了某些文件,突然来了任务,需要还原工作区。此时我就想把工作区中的改动保存一下, 保存成一个文件,此时就可以使用git diff > a.patch将工作区相对于暂存区的改动保存成一个patch。然后,后面可以使用git apply a.patch命令又得到我们以前的改动了。
3. git下的patch命令: git format-patch和git am
通常情况下,使用"git format-patch"命令生成patch,使用"git am"命令应用patch。使用"git format-patch"命令生成的patch的格式是git特有的,只能在git中使用。
git format-patch命令有两种常用的格式:
- git format-patch -n <commit>
- git format-patch <commitA>..<commitB>
格式1表示生成n个patch,从<commit>向前数。默认情况下,<commit>这个参数为HEAD。格式二表示生成生成<commitA>到<commitB>之间的所有提交对应的patch。
看下面一个例子:将master分支上面的提交转换为patch,应用到bugFix分支上面。
$ git branch
			* bugFix
			  master
			$ git checkout master
				Switched to branch 'master'
			$ git log master --oneline
				ca1f1f3 3 master
				b0d7869 2 master
				0a2109f 1 master
				5c47112 initial commit
			$ git log bugFix --oneline
				5c47112 initial commit
			$ git format-patch -3
				0001-1-master.patch
				0002-2-master.patch
				0003-3-master.patch
			$ rm *patch
			Switched to branch 'master'
			$ git format-patch master~3..master
				0001-1-master.patch
				0002-2-master.patch
				0003-3-master.patch
			$ git checkout bugFix
				Switched to branch 'bugFix'
			$ git am *.patch
				Applying: 1 master
				Applying: 2 master
				Applying: 3 master
			$ git log bugFix --oneline
				d4a68dd 3 master
				eec20d7 2 master
				01b5946 1 master
				5c47112 initial commit
			$
通过命令可以看出,使用git am命令后,会自动在git库中生成新的提交。这一点非常重要。
简单总结一下:
git format-patch和git am结合使用;"git diff"或"git show"和"git apply"结合着使用。git am命令会生成新的提交,git apply命令只是修改工作区而已。git apply是一个事务性操作的命令,也就是说,要么所有补丁都打上去,要么全部放弃。ProGit上说明在实际打补丁之前,可以先用"git apply --check"查看补丁是否能够干净顺利地应用到当前分支中:git apply --check patch,如果执行完该命令之后没有任何输出,表示我们可以顺利采纳该补丁,接下来就是git上的提交了。
现在来看一下使用"git am"命令打patch时出现冲突的情况:
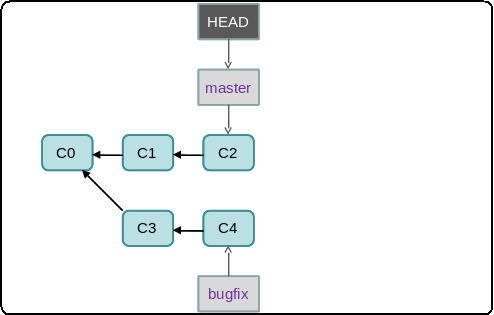
假设当前git库的提交记录入下图5-1所示:

[jicanmeng@andy andy]$ git branch
				  bugFix
				* master
			[jicanmeng@andy andy]$ git format-patch -2 bugFix
				0001-bugFix-1.patch
				0002-bugFix-2.patc
			[jicanmeng@andy andy]$ git am *.patch
				Applying: bugFix-1
				error: patch failed: a.c:1
				error: a.c: patch does not apply
				Patch failed at 0001 bugFix-1
				When you have resolved this problem run "git am --resolved".
				If you would prefer to skip this patch, instead run "git am --skip".
				To restore the original branch and stop patching run "git am --abort".
			[jicanmeng@andy andy]$ git apply 0001-bugFix-1.patch --reject
				Checking patch a.c...
				error: while searching for:
				1
				2
				3
				4
				5

				error: patch failed: a.c:1
				Checking patch b.c...
				Applying patch a.c with 1 rejects...
				Rejected hunk #1.
				Applied patch b.c cleanly.
			[jicanmeng@andy andy]$ git st
				# On branch master
				# Changed but not updated:
				#   (use "git add ..." to update what will be committed)
				#   (use "git checkout -- ..." to discard changes in working directory)
				#
				#       modified:   b.c
				#
				# Untracked files:
				#   (use "git add ..." to include in what will be committed)
				#
				#       0001-bugFix-1.patch
				#       0002-bugFix-2.patch
				#       a.c.rej
				no changes added to commit (use "git add" and/or "git commit -a")
			[jicanmeng@andy andy]$ vim a.c
			[jicanmeng@andy andy]$ git st
				# On branch master
				# Changed but not updated:
				#   (use "git add ..." to update what will be committed)
				#   (use "git checkout -- ..." to discard changes in working directory)
				#
				#       modified:   a.c
				#       modified:   b.c
				#
				# Untracked files:
				#   (use "git add ..." to include in what will be committed)
				#
				#       0001-bugFix-1.patch
				#       0002-bugFix-2.patch
				#       a.c.rej
				no changes added to commit (use "git add" and/or "git commit -a")
			[jicanmeng@andy andy]$ git add a.c b.c
			[jicanmeng@andy andy]$ git st
				# On branch master
				# Changes to be committed:
				#   (use "git reset HEAD ..." to unstage)
				#
				#       modified:   a.c
				#       modified:   b.c
				#
				# Untracked files:
				#   (use "git add ..." to include in what will be committed)
				#
				#       0001-bugFix-1.patch
				#       0002-bugFix-2.patch
				#       a.c.rej
			[jicanmeng@andy andy]$ git am --resolved
				Applying: bugFix-1
				Applying: bugFix-2
				error: patch failed: a.c:1
				error: a.c: patch does not apply
				Patch failed at 0002 bugFix-2
				When you have resolved this problem run "git am --resolved".
				If you would prefer to skip this patch, instead run "git am --skip".
				To restore the original branch and stop patching run "git am --abort".
			[jicanmeng@andy andy]$
如果使用"git am *.patch"命令失败,那么需要使用"git apply 失败的patch --reject"这个命令来打patch。0001-bugFix-1.patch这个patch中修改了a.c文件和b.c文件。从命令的结果中可以看到。b.c文件打patch成功,a.c文件打patch失败,将冲突的文件放到a.c.rej文件中。我们打开a.c.rej看看什么地方冲突,然后用vim打开a.c文件手动将a.c.rej文件中的部分修改到a.c中。然后将a.c和b.c都添加到暂存区,使用"git am --resolved"命令表示这个patch解决了,可以继续打下一个patch了。
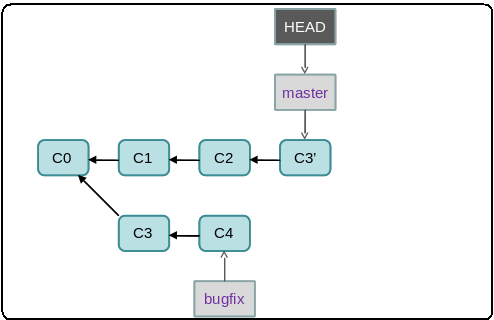
命令执行到这里,git库中的提交记录如下图5-2所示:

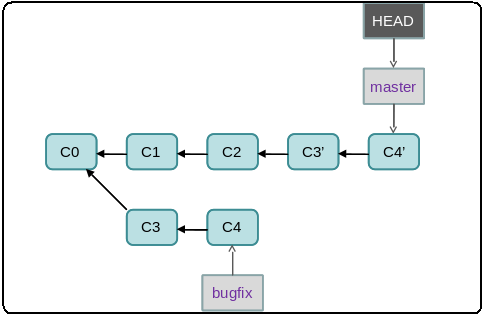
虽然此时已经有了一个C3'的提交,但是此时如果我们执行"git am --abort"命令,就会回到如图6-1所示的状态。我们继续解决下一个patch中的冲突,解决完之后,所有的patch就打完了,如图5-3所示:
